mvn deploy:deploy-file -DgroupId=com.somecompany -DartifactId=project -Dversion=1.0.0 -DgeneratePom=false -Dpackaging=jar -DrepositoryId=nexus -Durl=http://localhost:8081/nexus/content/repositories/releases -DpomFile=pom.xml -Dfile=target/project-1.0.0.jar
martes, 17 de octubre de 2017
Deploy to Nexus
With the following snippet you can deploy anything to Nexus.


Ant as a script director
Hi,
this entry on the blog is for using Ant as a scripting integration together with Groovy.
<project>
<property name="groovy.home" value="/home/vagrant/.sdkman/candidates/groovy/current/"/>
<property name="groovy.version" value="X.Y.Z"/>
<path id="groovy.classpath">
<fileset dir="${groovy.home}/lib">
<include name="**/*.jar"/>
</fileset>
</path>
<target name="targetSample">
<taskdef name="groovy" classname="org.codehaus.groovy.ant.Groovy" classpathref="groovy.classpath"/>
ant.ant(antfile:'build.xml'){ // you antfile name
target(name:'targetTest') // your targetName
property(name:'param1',value:'theParamValue') // your params name and values
}
def salutation="Hello World"
print(salutation)
</groovy>
</target>
<target name="targetTest">
<echo>Hola mundo Groovy! </echo>
</target>
</project>
Output
Buildfile: /home/vagrant/ant-tests/build.xml

targetSample:

targetTest:
     [echo] Hola mundo Groovy!
Hello World

BUILD SUCCESSFUL
Total time: 1 second
viernes, 8 de septiembre de 2017
Google Analytics from the command line
Use the following command
curl -d "v=1&tid=UA-104039318-1&cid=111&t=pageView&dp=/b/route&ds=web&cd3=GDL-MEX"
-X POST www.google-analytics.com/collect
How to perform Single sign-on with Nginx
Insert within server section:
 location = /auth {
            internal;
            proxy_pass              http://localhost:8080/auth.jsp;
            proxy_pass_request_body off;
            proxy_set_header        Content-Length "";
            proxy_set_header        X-Original-URI $request_uri;
        }

        location /examples/ {
            auth_request     /auth;
            auth_request_set $userid $upstream_http_userid;
            auth_request_set $role $upstream_http_role;
            proxy_set_header X-UserId $userid;
            proxy_set_header X-Role $role;
            proxy_pass              http://localhost:8080/examples/;
        }
martes, 15 de agosto de 2017
Converting Java to native code with GCJ
I recently discovered the power of gcc in order to create native executables from Java source code.
You never know when are you going to need it, but just in case, is good to know that is there:
gcj -c -g -O MyJavaProg.java
gcj --main=MyJavaProg -o MyJavaProg MyJavaProg.o
Jenkins Pipelines.
Hey!!!
I know it has been a while since my last post. It has been a very busy period in my life but now I wanted to take back my good habits and start writing posts related with software and infrastructure.
Today I will start with Jenkins (the most usefull tool I have found in these days).
pipeline{
    agent any
    stages{
        stage ('logic artifact build'){
            steps{
                echo 'Fase I construyendo artefacto aplicacion'
                echo params.BRANCH
                build job: 'XXXXXX', parameters: [string(name: 'BRANCH', value: params.BRANCH)]
            }
        }
        stage ('build web app'){
            steps{
                echo 'Fase II construiyendo el Web'
                echo params.BRANCH
                build job: 'XXXXXX', parameters: [string(name: 'PARAM_BRANCH', value: params.BRANCH)]
            }
        }
        stage ('resource assembly'){
            steps{
                build 'APACHE_CONFIG'
                build 'PACKAGE_ZIP'
            }
        }

    }
    post{
    always{
        echo 'Pipeline finished'
        echo params.BRANCH
    }
    success{
       echo 'Build was success'
    }
    failure{
       echo 'Build failed'
    }
  }

}
This DSL is a very basic PIPELINE job that can handle the construction, resource assembly, and deployment of the application. It's important to give your jobs parameters like branch, environment, etc... so you don't have to have a job for every environment.
jueves, 24 de julio de 2014
Managing cache-control in Apache with UrlRewrite
Configuracion

Sinrewriter (sample.html)
> GET /sample.html HTTP/1.1
< HTTP/1.1 200 OK
< Date: Thu, 24 Jul 2014 18:30:04 GMT
* Server Apache/2.4.7 (Ubuntu) is not blacklisted
< Server: Apache/2.4.7 (Ubuntu)
< Last-Modified: Thu, 24 Jul 2014 17:30:06 GMT
< ETag: "d-4fef3cec9be73"
< Accept-Ranges: bytes
< Content-Length: 13
< Content-Type: text/html
Con rewriter (sample.jsp)
> GET /sample.jsp HTTP/1.1
< HTTP/1.1 200 OK
< Date: Thu, 24 Jul 2014 18:30:24 GMT
* Server Apache/2.4.7 (Ubuntu) is not blacklisted
< Server: Apache/2.4.7 (Ubuntu)
< Last-Modified: Thu, 24 Jul 2014 17:31:48 GMT
< ETag: "14-4fef3d4e06612"
< Accept-Ranges: bytes
< Content-Length: 20
< Pragma: no-cache
< Cache-Control: max-age=0, no-store, no-cache, must-revalidate
miércoles, 15 de enero de 2014
OpenSSL CMS comand line operation
Here comes the new recipe for this year related to encryption with Openssl. And yessss, we are still alive....
martes, 23 de julio de 2013
lunes, 10 de septiembre de 2012
Accesing a H2 server database with PostgreSQL driver via ODBC
In order to setup a h2 instance we must start h2 daemon with the following syntax:
java -jar h2-1.3.163.jar -tcp -pg -baseDir /temp/db2
This command line means :
start h2 in server mode, allowing connections only from localhost setting root database to /temp/db2.
Other interesting options are:
In order to create the database you must connect with admin user (SA and password recommended) for the very first time. For that you only need a jdbc connection.
If the database does not have a password for the SA user, you must set it with the folling command:
ALTER USER SA SET PASSWORD 'sa'
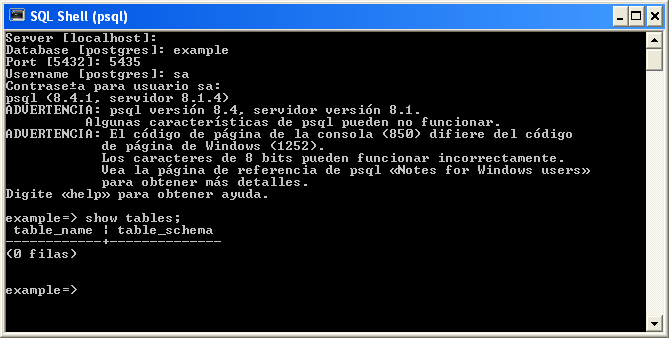
Then you can connect with a PostgreSQL client to the h2 database.
java -jar h2-1.3.163.jar -tcp -pg -baseDir /temp/db2
This command line means :
start h2 in server mode, allowing connections only from localhost setting root database to /temp/db2.
Other interesting options are:
-tcpPort 9101
-tcpAllowOthers
-pgAllowOthers
In order to create the database you must connect with admin user (SA and password recommended) for the very first time. For that you only need a jdbc connection.
If the database does not have a password for the SA user, you must set it with the folling command:
ALTER USER SA SET PASSWORD 'sa'
Then you can connect with a PostgreSQL client to the h2 database.
miércoles, 18 de abril de 2012
OpenSSL Cheat sheet
Today I have found a very interesting web page http://wiki.samat.org/CheatSheet/OpenSSL it contains a lot of interesting recipes with short descriptions about functionallity.
OPENSSL CA
Selfsigned CA:
Steps
1) Create private key
openssl genrsa -aes128 -passout pass:foobar -out keys/privkey.pem 2048
2) Create public key
openssl req -new -x509 -days 1001 -key keys/privkey.pem -passin pass:foobar -out ca.cer <<EOF
>ES
>Spain
>Madrid
>Test
>Security
>AutoridadVal
>tt@none.es
>EOF
Steps
1) Create private key
openssl genrsa -aes128 -passout pass:foobar -out keys/privkey.pem 2048
2) Create public key
openssl req -new -x509 -days 1001 -key keys/privkey.pem -passin pass:foobar -out ca.cer <<EOF
>ES
>Spain
>Madrid
>Test
>Security
>AutoridadVal
>tt@none.es
>EOF
Script for data encryption with openssl
#!/bin/bash
export data=$2
openssl enc -blowfish -e -a -pass pass:$1 <<EOF
$data
EOF
Suscribirse a:
Entradas (Atom)